身份验证与授权
强大的身份验证和授权方法对于现代多用户 web 应用程序至关重要。虽然它们经常可以互换使用,但身份验证和授权是独立的过程:
身份验证,就是确认用户就是他们所说的那个人
授权,就是赋予这些用户访问资源的权限
使用 Auth 进行身份验证
py4web comes with an object Auth and a system of plugins for user
authentication. It has the same name as the
corresponding web2py one and serves the same purpose but the API and
internal design is very different.
_scaffold 应用程序为其标准用法提供了指导。默认情况下,它使用本地 SQLite 数据库,并允许创建新用户、登录和注销。请注意,如果不进行配置,则必须手动启用新用户(通过访问控制台上登录的链接或直接编辑数据库)。
要使用 Auth 对象,首先要做的是导入它,并进行实例化、配置和启用。
from py4web.utils.auth import Auth
auth = Auth(session, db)
# (configure here)
auth.enable()
导入步骤是显而易见的。第二步除了告诉 Auth 对象使用哪个会话对象和使用哪个数据库外,不执行任何操作。Auth 数据存储在会话 session['user'] 中,如果用户登录,则用户id 存储在会话 session[‘user’][‘id’] 中。 db 对象用于在 auth_user 表中存储有关用户的持久信息,如果缺少该表,则会创建该表。auth_user 表包含以下字段:
username
email
password
first_name
last_name
sso_id (用于单点登录,见下文)
action_token (用于验证电子邮件、禁用用户和其他任务,另见下文)
auth.enable() 会创建和公开下面的 RESTful API :
{appname}/auth/api/register (POST)
{appname}/auth/api/login (POST)
{appname}/auth/api/request_reset_password (POST)
{appname}/auth/api/reset_password (POST)
{appname}/auth/api/verify_email (GET, POST)
{appname}/auth/api/logout (GET, POST) (+)
{appname}/auth/api/profile (GET, POST) (+)
{appname}/auth/api/change_password (POST) (+)
{appname}/auth/api/change_email (POST) (+)
标有(+)的需要登录用户。
Auth UI
您可以使用上述 API 创建自己的 web UI 来登录用户,但 py4web 提供了一个示例,在以下文件中实现:
_scaffold/templates/auth.html
_scaffold/templates/layout.html
关键部分位于 layout.html 中,其中(使用 no.css 框架)定义了菜单操作:
 1<ul>
 2   [[if globals().get('user'):]]
 3   <li>
 4   <a class="navbar-link is-primary">
 5      [[=globals().get('user',{}).get('email')]]
 6   </a>
 7   <ul>
 8      <li><a href="[[=URL('auth/profile')]]">Edit Profile</a></li>
 9      [[if 'change_password' in globals().get('actions',{}).get('allowed_actions',{}):]]
10         <li><a href="[[=URL('auth/change_password')]]">Change Password</a></li>
11      [[pass]]
12      <li><a href="[[=URL('auth/logout')]]">Logout</a></li>
13   </ul>
14   </li>
15   [[else:]]
16   <li>
17   Login
18   <ul>
19      <li><a href="[[=URL('auth/register')]]">Sign up</a></li>
20      <li><a href="[[=URL('auth/login')]]">Log in</a></li>
21   </ul>
22   </li>
23   [[pass]]
24</ul>
菜单是动态的:在第 2 行检查用户是否已经定义(即用户是否已经登录)。在用户登录后,电子邮件显示在顶部菜单中,以及菜单选项 Edit Profile 、 Change Password (可选)和 Logout 。相反,如果用户尚未登录,则从第 15 行开始,只允许使用相应的菜单选项: Sign up 和 Log in 。
然后,每个菜单选项都会将用户重定向到相应的标准 URL ,这反过来会激活对应的 Auth 操作。
在 actions 中使用 Auth
在 action 中使用 Auth 对象有两种方法。
第一种,不强制登录。使用 @action.uses(auth) ,我们告诉 py4web ,此操作应该包含有关用户的信息,并尝试解析用户会话中的信息。
@action('index')
@action.uses(auth)
def index():
    user = auth.get_user()
    return 'hello {first_name}'.format(**user) if user else 'not logged in'
第二种,在需要时会强制登录:
@action('index')
@action.uses(auth.user)
def index():
    user = auth.get_user()
    return 'hello {first_name}'.format(**user)
这里 @action.uses(auth.user) 告诉 py4web ,此操作需要登录的用户,如果没有用户登录,则应重定向到登录页面。
Custom actions after Auth events
After every Auth event, like: password_reset, login, register, verify_email, etc, it is possible to trigger an action. For example, to redirect a user to specific page after sign up and successfully email verification, we can do the following:
in common.py
.. code:: python
#function triggered after a sign up with email verification sign up. def after_register_callback(_, user_row):
redirect(URL('pending_registration'))
#function triggered after a successfull email verification. def after_verify_email_callback(_, user_row):
redirect(URL('success_verification'))
In the Auth section before auth.define_tables() or auth.fix_actions(), add:
Example:
Authentication with CAPTCHA
CAPTCHAs are essential security measures that prevent automated bot abuse on public forms. To implement Google reCAPTCHA or hCAPTCHA in your authentication form, follow these steps:
Enabling Google reCAPTCHA
In settings.py add your keys:
RECAPTCHA_API_SECRET_V3 = "your_recaptcha_secret_key_v3"
RECAPTCHA_API_KEY_V3 = "your_recaptcha_site_key_v3"

RECAPTCHA_API_KEY_V2 = "your_recaptcha_site_key_v2"
RECAPTCHA_API_SECRET_V2 = "your_recaptcha_secret_key_v2"
In common.py add:
#import the functionality
from . import settings
from py4web.utils.recaptcha import ReCaptcha

# To use recaptcha v3
recaptcha = ReCaptcha(settings.RECAPTCHA_API_KEY_V3, settings.RECAPTCHA_API_SECRET_V3, "v3")
or
# To use  recaptcha v2
recaptcha = ReCaptcha(settings.RECAPTCHA_API_KEY_V2, settings.RECAPTCHA_API_SECRET_V2, "v2")


# in the section that auth is defined
# Example:
auth = Auth(session, db, define_tables=False)

# Add this line at the end of auth declaration to enable recaptcha on login, register and request_reset_password forms.
# or enable it on the action that you want by specifying the action name

#Example:

auth.extra_form_fields = {"login": [recaptcha.field], "register": [recaptcha.field], "request_reset_password": [recaptcha.field], }


#In section where auth is enabled, add the recaptcha fixture
# Example:

# #######################################################
# Enable authentication line
# #######################################################
auth.enable(uses=(session, T, db, recaptcha.fixture),env=dict(T=T))
Finally in auth.html add:
After completing these steps, the reCAPTCHA field will be added to the login, register, and request_reset_password forms.
Enabling hCAPTCHA
in settings.py add your HCAPTCHA_SITE_KEY and HCAPTCHA_SECRET_KEY:
In common.py add:
Finally in auth.html add:
[[=globals().get("form","")]]
[[=hcaptcha]]
After completing these steps, the hCAPTCHA field will be added to the login, register, and request_reset_password forms.
双因素身份验证
双因素身份验证(或两步验证)是一种提高身份验证安全性的方法。激活后,登录过程中会添加一个额外的步骤。在第一步中,用户将看到标准的用户名/密码表单。如果他们通过提交正确的用户名和密码成功通过了此步验证,并且为用户启用了双因素身份验证,服务器将在他们登录之前显示第二个表单。
有一些 Auth 设置可用于控制双因素身份验证的工作方式。
可以在 Auth 实例化时指定以下内容:
two_factor_requiredtwo_factor_sendtwo_factor_validate
two_factor_required
当您将方法名称传递给 two_factor_required 参数时,您是在告诉 py4web 调用该方法,以确定是否应该使用或绕过双因素身份验证。如果您的方法返回 True ,则此登录需要双因素身份验证。如果返回 False ,则此登录将绕过双因素身份验证。
two_factor_required 方法的示例
此示例显示了如何允许特定网络上的用户。
def user_outside_network(user, request):
    import ipaddress

    networks = ["10.10.0.0/22"]

    ip_list = []
    for range in networks:
        ip_list.extend(ipaddress.IPv4Network(range))

    if ipaddress.IPv4Address(request.remote_addr) in ip_list:
        #  if the client address is in the network address list, then do NOT require MFA
        return False

    return True
two_factor_send
当双因素身份验证处于活动状态时,py4web 可以生成一个 6 位代码(使用 random.randint ),并可以将其发送给用户。如何发送此代码取决于您。Auth 类的``two_factor_send`` 参数允许您指定将双因素代码发送给用户的方法。
此示例显示了如何使用双因素代码发送电子邮件:
def send_two_factor_email(user, code):
    try:
        auth.sender.send(
            to=[user.email],
            subject=f"Two factor login verification code",
            body=f"Your verification code is {code}",
            sender="from_address@youremail.com",
        )
    except Exception as e:
        print(e)
    return code
请注意,此方法接受两个参数:当前用户和要发送的代码。还要注意,此方法可以覆盖代码并返回一个新的代码。
auth.param.two_factor_required = user_outside_network
auth.param.two_factor_send = send_two_factor_email
two_factor_validate
默认情况下,py4web 将通过比较用户输入的代码与使用 two_factor_send 生成和发送的代码来验证双因素表单中的用户输入。然而,有时定义用户输入代码的自定义验证可能是有用的。例如,如果要使用 TOTP(或基于时间的一次性密码)作为双因素身份验证方法,验证需要将用户输入的代码与服务器端同时生成的值进行比较。因此,在显示表单时(例如使用 two_factor_send 方法)提前生成该值是不够的,因为到用户提交表单时,当前有效值可能已经不同。相反,应在验证用户提交的表单时生成此值。
为了完成这种自定义验证,可以使用 two_factor_validate 方法。这需要两个参数:
user :当前用户
code :用户在双因素身份验证表单中输入的代码
此方法的主要用例是验证基于时间的密码。
此示例显示了如何验证基于时间的双因素代码
def validate_code(user, code):
   try:
      # get the correct code from an external function
      correct_code = generate_time_based_code(user_id)
   except Exception as e:
      # return None to indicate that validation could not be performed
      return None

   # compare the value entered in the auth form with the correct code
   if code == correct_code:
      return True
   else:
      return False
validate_code 方法必须返回以下三个值之一:
True- 如果验证成功False- 如果严重失败None- 如果因任何原因无法验证
请注意,如果定义了此方法,则总会调用它来验证双因素身份验证表单。由您决定它执行何种验证。如果返回值为 True ,则用户输入将被视为有效。如果返回值为 False ,则用户输入将被视为无效而被拒绝,尝试次数将减少一次,并要求用户重试。如果返回值为 None ,则将根据使用 two_factor_send 方法生成的代码检查用户输入,最终结果将取决于该比较。在这种情况下,如果未定义 two_factor_send 方法,则身份验证将失败,因此不向用户发送代码。
auth.param.two_factor_validate = validate_code
two_factor_tries
默认情况下,用户有 3 次机会尝试双因素身份验证。您可以使用下面的设置覆盖此内容:
auth.param.two_factor_tries = 5
完成所有设置后,双因素身份验证的流程为:
显示登录页面
- 成功登录后,用户通过 two_factor_required 验证流程
定向到 py4web 的 auth/two_factor 处"
- 如果定义了
two_factor_send: 生成 6 位的数字验证码
调用
two_factor_send将验证码发送给用户
- 如果定义了
显示验证页面,用户可以在其中输入他们的代码
如果定义了
two_factor_validate方法,则调用它来验证用户输入的代码验证成功后,将用户带到传递给登录页面的 _next_url
重要!如果您在应用程序中过滤了 ALLOWED_ACTIONS ,请确保将 "two_factor" 操作列入白名单,以免阻止双因素 API。
身份验证的插件
插件在 “py4web/utils/auth_plugins” 中定义,它们具有层次结构。有些是排他性的,有些不是。例如,默认情况下,LDAP、PAM 和 SAML 是排他的(开发人员必须选择一个)。默认情况下, Google、Facebook 和 Twitter OAuth 不是排他性的(开发人员可以全部选择,用户可以使用 UI 进行选择)。
<auth/> 组件将根据安装的插件的要求自动适应显示登录表单。
在 _scaffold/settings.py 和 _scaffold/common.py 文件中,您可以看到支持的插件的默认值设置。
PAM
配置 PAM 最简单:
from py4web.utils.auth_plugins.pam_plugin import PamPlugin
auth.register_plugin(PamPlugin())
与所有插件一样,此插件必须导入并注册。此插件的构造函数不需要任何参数(其他插件需要)。
auth.register_plugin(...) 必须 位于 auth.enable() 之前,因为在挂载所需的插件之前公开 API 是没有意义的。
备注
根据设计,只有当 py4web 由 root 运行时,使用本地用户的 PAM 身份验证才能正常工作。否则,您只能对运行 py4web 进程的特定用户进行身份验证。
LDAP
这是一种常见的身份验证方法,特别是在企业中使用 Microsoft Active Directory。
from py4web.utils.auth_plugins.ldap_plugin import LDAPPlugin
LDAP_SETTING = {
    'mode': 'ad',
    'server': 'my.domain.controller',
    'base_dn': 'cn=Users,dc=domain,dc=com'
}
auth.register_plugin(LDAPPlugin(**LDAP_SETTINGS))
警告
它需要 python-lda 模块。在 Ubuntu 上,您还应该使用 sudo apt-get install libldap2-dev libsasl2-dev 提前安装一些开发人员库。
用于 Google 的 OAuth2
from py4web.utils.auth_plugins.oauth2google import OAuth2Google # TESTED
auth.register_plugin(OAuth2Google(
    client_id=CLIENT_ID,
    client_secret=CLIENT_SECRET,
    callback_url='auth/plugin/oauth2google/callback'))
客户 id 和客户密钥必须由 Google 提供。
默认情况下,Google OAuth 将用户的名字、姓氏和电子邮件存储在 auth_user 表中,但不存储配置文件图片。您只需在 common.py 中添加几行代码即可包含个人资料图片 URL 。
from py4web.utils.auth_plugins.oauth2google import OAuth2Google  # TESTED
...
auth = Auth(session, db, define_tables=False)
auth.extra_auth_user_fields = [
   Field('profile_picture', 'text', readable=False, writable=False)
]
...
OAuth2Google.maps['profile_picture'] = 'picture'
一旦配置文件图片 URL 存储在 auth_user 中,您就可以轻松地将其与其他用户信息一起使用。
用于 Facebook 的 OAuth2
from py4web.utils.auth_plugins.oauth2facebook import OAuth2Facebook # UNTESTED
auth.register_plugin(OAuth2Facebook(
    client_id=CLIENT_ID,
    client_secret=CLIENT_SECRET,
    callback_url='auth/plugin/oauth2google/callback'))
客户 id 和客户密钥必须由 Facebook 提供。
用于 Discord 的 OAuth2
from py4web.utils.auth_plugins.oauth2discord import OAuth2Discord
auth.register_plugin(OAuth2Discord(
    client_id=DISCORD_CLIENT_ID,
    client_secret=DISCORD_CLIENT_SECRET,
    callback_url="auth/plugin/oauth2discord/callback"))
要获取 Discord 客户端 ID 和密钥,请在以下位置创建应用程序 https://discord.com/developers/applications 。您还必须在创建的应用程序中以h http(s)://<your host>/<your app name>/auth/plugin/oauth2discord/callback 的形式注册您的 OAuth2 重定向 URI 。
备注
由于 Discord 用户没有名字/姓氏的概念,因此 auth 表中的用户将包含 Discord 的用户名作为名字,discriminator 作为姓氏。
Auth API 插件
There are two types of web APIs, those called by the browser for example by a single page web app, and those designed to be called by a different kind of program. Both of them may need to support authentication. The distinction is important because, in the case of the browser, there is no need to manage any authentication token as the browser already provides cookies and py4web uses cookies to handle sessions. If the user operating the browser is logged-in, when an API is called, the corresponding action already knows who the user is. No additional logic is necessary. In this case there there is no need for any kind of additional API token which would only diminish the security provided by the cookie based session token.
当 API 被不同的程序(例如脚本)访问时,情况就不同了。没有会话,我们不想每次都向用户询问密码。在这种情况下,验证用户的标准方法是向用户颁发 API 令牌,也就是字符串,当与 API 请求一起呈现时,该令牌允许 py4web 识别调用者的身份。这也被称为 "Authentication bearer" 。
Py4web 提供了一个插件系统,为您提供了很大的灵活性,但它也提供了两个在大多数情况下都足够的实用插件。这两个插件名为:SimpleTokenPlugin 和 JwtTokenPlugin 。在大多数情况下,建议使用两者中的第一种。
所有插件的共同点:
它们为用户提供了一种创建字符串令牌的方法。
当对 @action.uses(auth) 或 @action.users(auth.user) 的操作发出 HTTP(S) 请求时,如果令牌存在,py4web 将识别用户,就像用户登录一样。
SimpleTokenPlugin 和 JwtTokenPlugin 的共同点:
当发出 HTTP(S) 请求时,令牌必须放在 “Authentication” 的标头中。如果你想以其他方式传递它,需要你创建自己的插件。
每个用户都可以根据需要创建任意数量的令牌。
如果应用程序逻辑需要/允许,用户可以为其他用户创建令牌。
SimpleTokenPlugin 的独特功能:
令牌是一个 UUID
令牌可以在服务器端进行管理(创建、删除、过期、更改过期)。
Current tokens are stored in a database table.
默认表将令牌与所有者和文本描述相关联。然而,用户可以提供自己的表,并将任何所需的元数据添加到令牌中,应用程序可以检索这些令牌,以区分同一用户的不同令牌。这是通过向表中添加字段来实现的。
Under the hood verifying a token requires a database query.
JvtokenPlugin 的独特功能:
令牌是一个加密和数字签名的字典,用于存储 user_id 和过期时间。
令牌的作者可以在创建时将任何元数据添加到令牌中。
令牌不存储在服务器端的任何位置,也没有对应的数据库表。
Tokens can be created (and there is a function to do so) but they cannot be managed. The server cannot expire tokens or change expiration. This would require the tokens to validated against a database and that is exactly what the JwtTokenPlugin tries to avoid.
使令牌过期的唯一方法是更改用于验证的服务器端密钥,这样当令牌过期时,所有令牌都会过期。
SimpleTokenPlugin 是大多数应用程序的推荐令牌类型。JwtTokenPlugin 在过期时间较短且提前知道的情况下以及在避免数据库查找非常重要的情况下是有价值的,例如对于非常快速的 action ,并且为了避免数据库访问而愿意牺牲一点安全性(服务器端令牌过期能力)。
SimpleTokenPlugin 的示例
在 common.py 中添加:
from py4web.utils.auth import SimpleTokenPlugin
simple_token_plugin = SimpleTokenPlugin(auth)
auth.token_plugins.append(simple_token_plugin)
您可以选择使用参数 table=db.mytable 来自定义表。否则,它将创建并使用一个名为 “auth_simple_token” 的存储令牌的表。
在 controllers.py 中添加
@action("test_api")
@action.uses(auth.user)
def test_api():
    return {"hello": "world"}
用户可通过以下方式访问此 action :若使用浏览器且已登录,无需令牌(token)即可访问;若通过 API 访问,则需提供令牌。
curl http://127.0.0.1:8000/test1/test_api -H "Authorization: Bearer {token}"
为了创建和管理令牌,您可以使用 grid 。在 controllers.py 中
@action("tokens")
def _():
   db.auth_simple_token.user_id.default = auth.user_id
   grid = Grid(db.auth_simple_token.user_id==auth.user_id, create=True, deletable=True)
   return dict(grid=grid)
JwtTokenPlugin 示例
在 common.py 中添加:
from py4web.utils.auth import SimpleTokenPlugin
jwt_token_plugin = JwtTokenPlugin(auth)
auth.token_plugins.append(jwt_token_plugin)
在 controllers.py 中,它的工作原理与 SimpleTokenPlugin 相同:
@action("test_api")
@action.uses(auth.user)
def test_api():
    return {"hello": "world"}
令牌也使用与上例中相同的标头传递:
curl http://127.0.0.1:8000/test1/test_api -H "Authorization: Bearer {token}"
虽然你不能管理令牌,但你仍然需要一种创建它们的方法。例如,您可以创建一个 action ,当调用它时,它会给您一个新的令牌。在 controllers.py 中添加
@action("make_token")
@action.uses("generic.html", auth.user)
def make_token():
     return dict(token=jwt_token_plugin.make(
        auth.current_user,
        expiration=utcnow()+datetime.timedelta(days=10)))
自定义令牌插件示例
令牌插件只是一个类,在收到请求后,它会返回一个关联的用户。例如,这里有一个愚蠢且不安全的插件,只要提供 “Authentication” 标头,它就会授权每个人作为用户 1
从 py4web 导入 request
class MyCustomTokenPlugin:
    def get_user(self):
        authorization = request.headers.get("Authentication")
        if authorization:
            return db.auth_user(1)
        return None

auth.token_plugins.append(MyCustomTokenPlugin())
使用 Tags 进行授权
如前所述,授权是验证用户可以访问哪些特定应用程序、文件和数据的过程。这是在py4web 中使用 Tags 完成的,我们已经在 DAL 章节中的 标记记录(Tagging records) (标记记录)部分了解了。
Tags 和权限
Py4web 提供了一种通用的标记机制,允许开发人员标记任何表的任何记录,检查标记的存在,以及检查包含标记的记录。组成员资格可以被认为是我们应用于用户的一种标签。权限也可以是标签。开发人员可以在标记系统之上自由创建自己的逻辑。
备注
Py4web 没有 web2p y那样的组概念。经验表明,虽然这种机制很强大,但它存在两个问题:对于大多数应用程序来说,它过于强大,对于非常复杂的应用程序来说不够灵活。
要使用标记系统,您首先需要从 pydal.tools 导入 Tags 模块。然后创建一个Tags 对象来标记表:
from pydal.tools.tags import Tags
groups = Tags(db.auth_user, 'groups')
tail_name 参数是可选的,如果未指定,将使用默认值 'default' 。如果您在数据库级别查看,里面创建了一个新表,其名称等于 tagged_db.table + '_tag_' + tail_name ,在本例中为 auth_user_tag_groups :

然后,您可以向表的记录添加一个或多个标记,也可以删除现有的标记:
groups.add(user.id, 'manager')
groups.add(user.id, ['dancer', 'teacher'])
groups.remove(user.id, 'dancer')
在 auth_user_tag_groups 上,这将生成两条记录,其中不同的组分配给同一个 user.id(“Record ID” 字段):
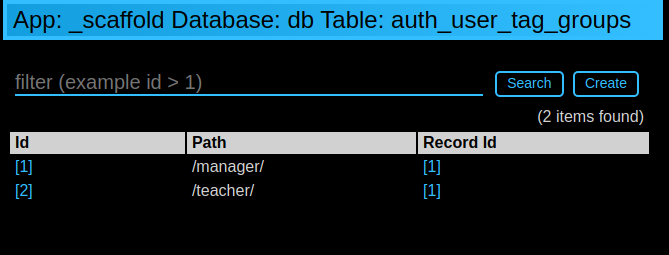
标签开头或结尾的斜线是可选的。所有其他字符在同等条件下都是允许的。
一个常见的用例是 基于组的访问控制 。在这里,开发人员首先检查用户是否是 'manager' 组的成员,如果用户不是经理(或没有人登录),py4web 就会重定向到 'not authorized url' 。否则,如果用户属于正确的组, py4web 就显示 “hello manager” :
@action('index')
@action.uses(auth.user)
def index():
    if not 'manager' in groups.get(auth.get_user()['id']):
        redirect(URL('not_authorized'))
    return 'hello manager'
在这里,开发人员查询数据库中具有所需标签的所有记录:
@action('find_by_tag/{group_name}')
@action.uses(db)
def find(group_name):
    users = db(groups.find([group_name])).select(orderby=db.auth_user.first_name | db.auth_user.last_name)
    return {'users': users}
We've already seen a simple requires_membership fixture on Condition 夹具. It
enables the following syntax:
groups = Tags(db.auth_user)

class requires_membership(Fixture):
    def __init__(self, group):
        self.__prerequisites__ = [auth.user] # you must have a user before you can check
        self.group  = group # store the group when action defined
    def on_request(self, context): # will be called if the action is called
        if self.group not in groups.get(auth.user_id):
            raise HTTP(401) # check and do something

@action('index')
@action.uses(requires_membership('teacher'))
def index():
    return 'hello teacher'
作为留给你的练习,我们将创建夹具 has_membership 以启用以下语法:
@action('index')
@action.uses(has_membership(groups, 'teacher'))
def index():
    return 'hello teacher'
重要提示: Tags 会自动分层。例如,如果用户有一个组标签 ‘teacher/high-school/physics’ ,那么以下所有搜索都将返回该用户:
groups.find('teacher/high-school/physics')groups.find('teacher/high-school')groups.find('teacher')
这意味着斜线对标签具有特殊含义。
用户模拟
Auth 提供 API,允许您模拟其他用户。下面是一个开始模拟和停止模拟另一个用户的 action 示例。
@action("impersonate/{user_id:int}", method="GET")
@action.uses(auth.user)
def start_impersonating(user_id):
    if (not auth.is_impersonating() and
        user_id and
        user_id != auth.user_id and
        db(db.auth_user.id==user_id).count()):
        auth.start_impersonating(user_id, URL("index"))
    raise HTTP(404)

 @action("stop_impersonating", method="GET")
 @action.uses(auth)
 def stop_impersonating():
    if auth and auth.is_impersonating():
        auth.stop_impersonating(URL("index"))
    redirect(URL("index"))